Introduction
This is a tutorial on how to edit a sermon file, which is supplementary to the workshop series "Introduction to Logic 9: Post production". There will be links and notes at the end of each section to other topics or references if you need to read up about them.
Today we will be using the stereo track recorded from the X32's USB recorder, and of course Apple Logic 9 Express. The basic usage of L9 Express and Pro are pretty much the same, most of the differences between them is the extensive plugin library and some other extra features that exist in the "Pro" version. More about that in another topic.
Setting up Logic 9 and your files
The first thing to do after receiving the file from the USB is to save/copy it to your working audio folder and rename it. The X32 will auto-name the file as "R_YYYYMMDD_HHMMSS.wav", and to bring it to our naming standards just take out the R_20 at the start of the name.
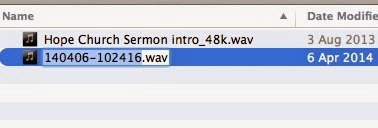 |
| Renaming the source file |
Open up Logic 9 and create a new project. For the time being, ignore the "Create new tracks" window since we are not recording any tracks, just editing. Click on the [Create] button so we can get started.
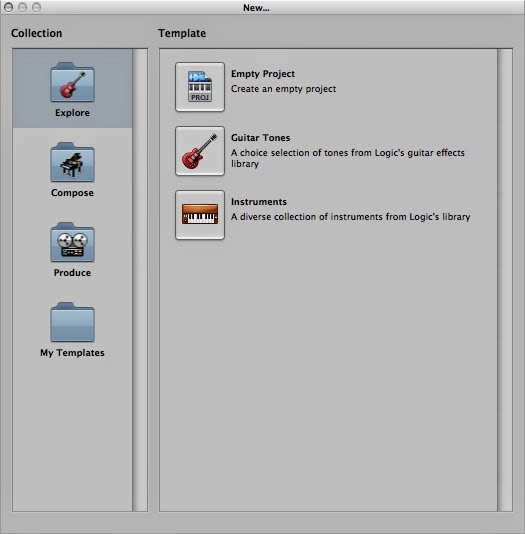 |
| Logic 9 New Project box |
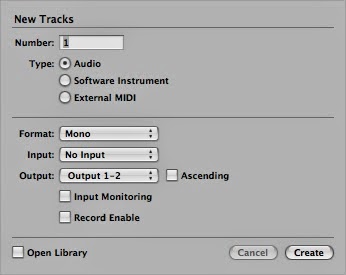 |
| Logic 9 Create New Tracks box |
Before you start doing anything, you need to save the new project. The "Save As" box should appear, navigate to the folder that you have the files kept in, and save the project with the same file name as your raw WAV file. (this just keeps things a bit more tidy for archiving). Tip: While you have the filename edit box open, you can copy the name into the clipboard for the moment, and then paste it into the Save As box to keep it the same name.
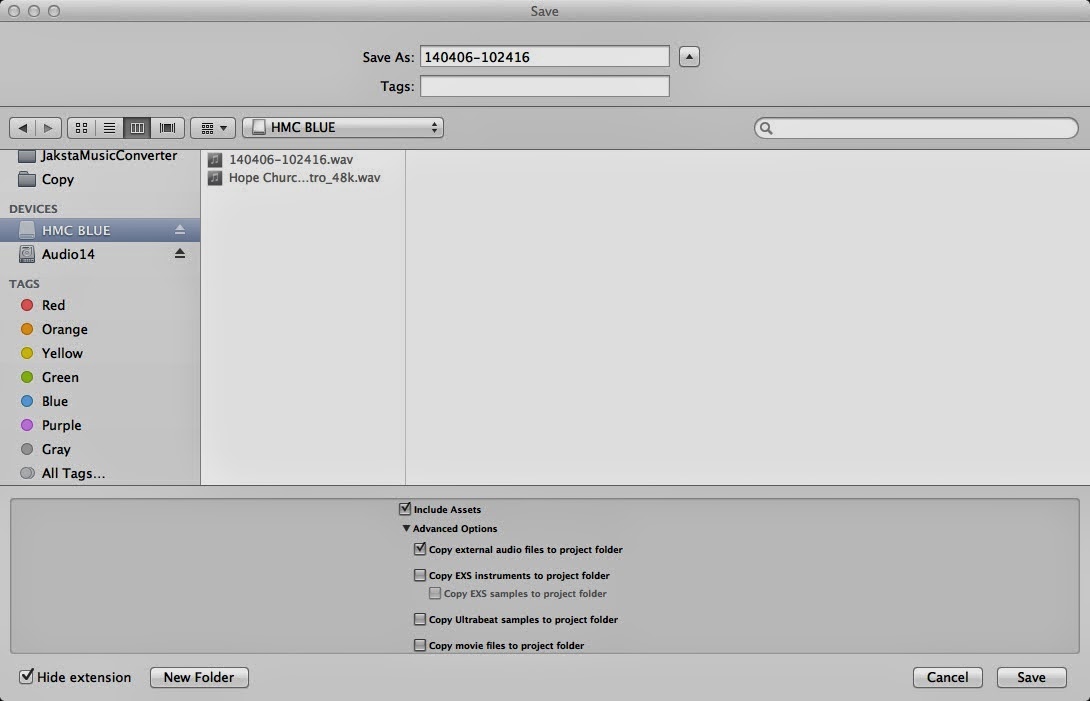 |
| Logic 9 "Save As" Box |
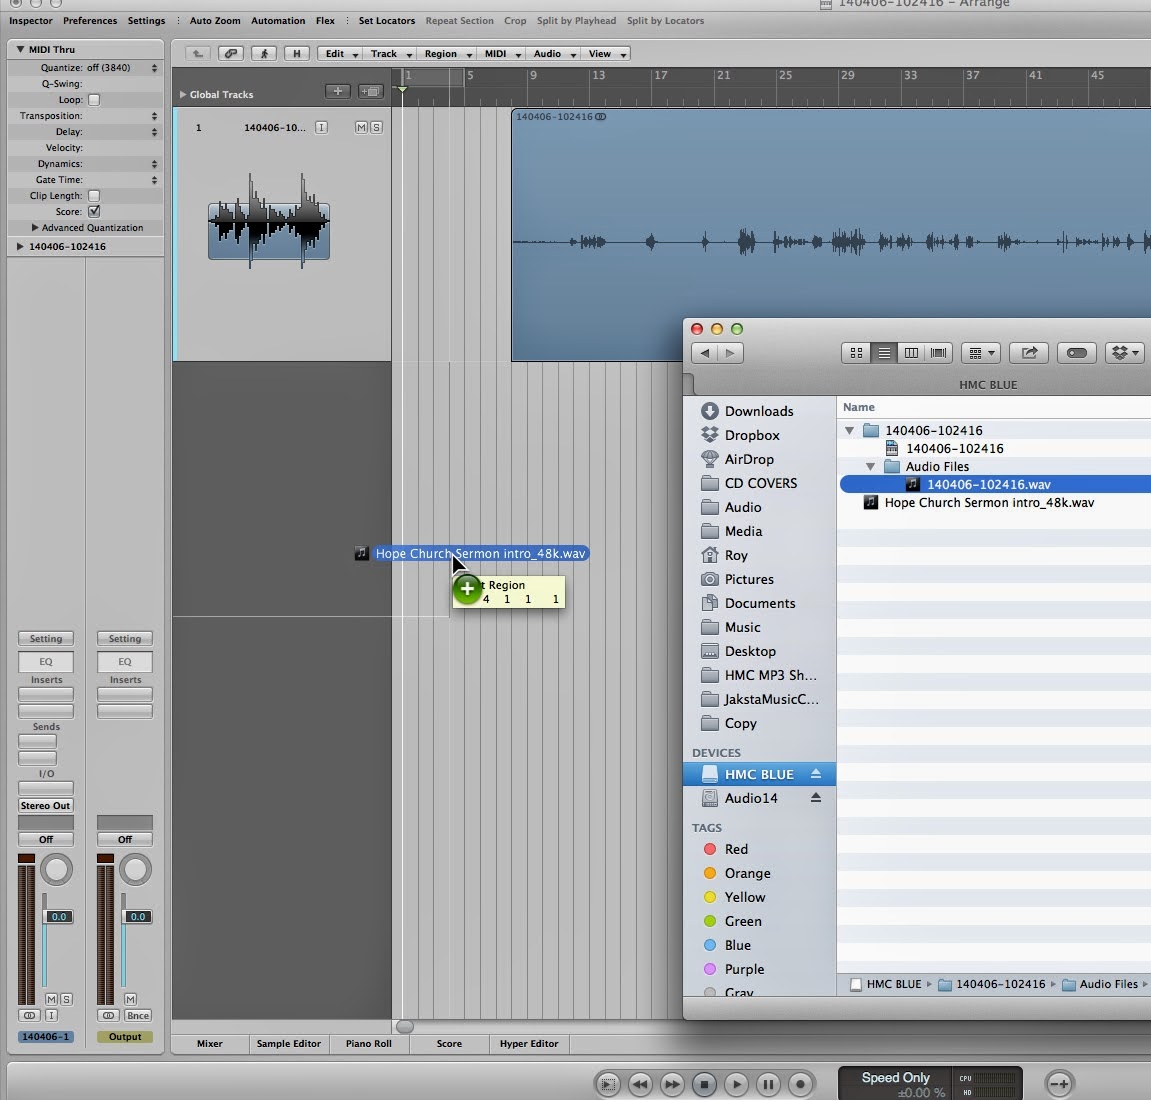
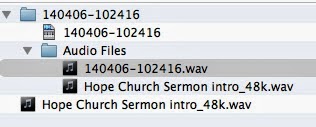
Once you have saved the project, Logic would have created a new folder where your audio folder is with the name of the project, and inside that is the .logic project file (this is where L9 stores the information needed about the project) and the Audio Files folder (aka Audio bin). Drag your raw WAV file into the audio files folder.
 |
| Dragging the file to the Audio folder in Finder |
To import your wav/mp3 files into logic, it's as simple as drag and dropping it from the finder window. Dragging it to an existing track will add that soundbite to the track you dropped into at the time/place your mouse is, whereas dragging the soundbite to an empty part of the arrange screen it will add it as a new track.
If it is in the audio bin or audio folder of the project already, Logic will automatically use that file, otherwise if you are dragging a file from somewhere else, Logic will automatically copy the file to the project folder (unless that option has been disabled). For example, when we drag over the sermon file, Logic will insert it into the program as is, but when we drag over the HMC intro file from another folder, logic will make a copy of it to use in the project, and keep the original where it is.
 |
| Dragging files into Logic's Arrange window |
 |
| Logic's automatic copy file from external source |
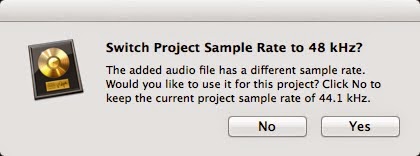
Most often the "Sample Rate" window will pop up, especially when starting a new project, because the sample rate we record at is different from the sample rate that Logic expects by default. L9, compared to the older versions picks up on this and offers you to change the sample rate to match. Otherwise you will have to change this manually. See note below on extra info.
 |
| Logic change sample rate box |
After you have imported tracks to the arrange window, you can safely remove the blank "Audio 1" track since it isn't need it anymore.
For now we are done with the arrangement window, its time to work with the mixer. The mixer has similar layout to a mixing desk you would have used for live, with a few differences. For now it doesn't matter if you use the half mixer window (click the "Mixer" button at the bottom of the arrange window), full mixer window (⌘2) or just the Inspector sidebar. All of them have the same function. You can read up on how the mixer window functions in the links below.
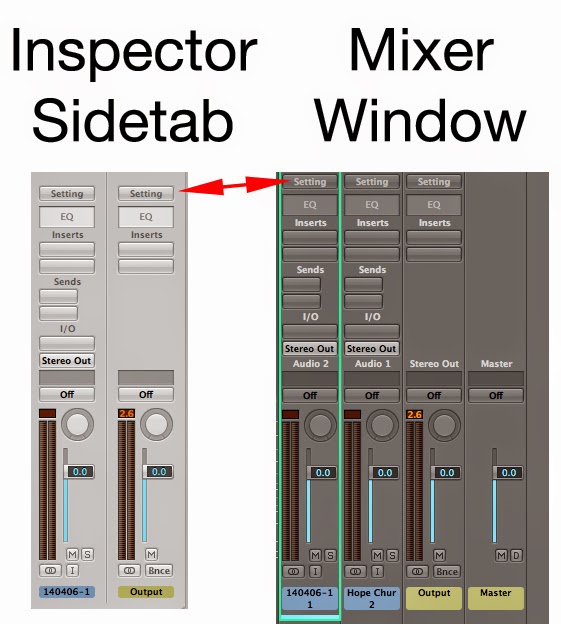
Here we are going to set some preset plugins. Clicking on the "Settings" button in your mixer will drop down a context menu, and along those settings there are already made preset plugin combos that Logic has provided us. The standard preset used for the output channel strip is "Hi-Fi" or "Broadcast Ready" under "Mastering", and for the speaker's track, under "Vocal > Speech" either Male or Female Radio Moderation, depending on who is speaking. Note the difference in the context menu options between the "Output" tracks, "Audio" tracks and the Aux (if any).
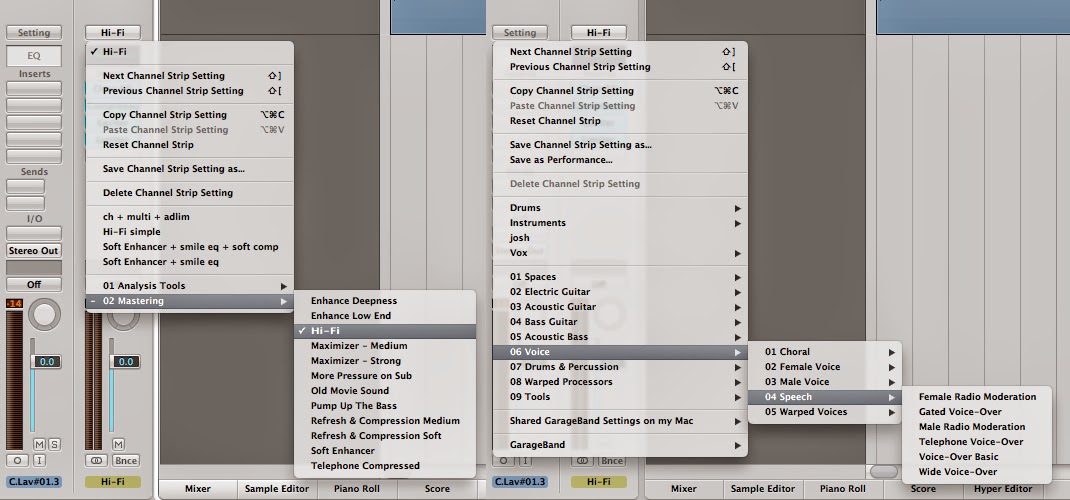 |
| Preset context menu options Output (Left) and Audio tracks (Right) |
The channel strip will change its look slightly different with a certain combination of plugins now inserted automatically, like the picture below. Feel free to change its parameters and settings, disable/add extra plugins where required. The plugins chosen should suffice, with only minor changes to the EQ and Compression in relevance with the speaker's voice.
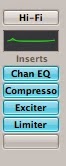 |
| Output inserts strip |
Volume Matching
Volume matching is an important part of sermon editing. Think about these two scenarios:
- the listener starts playing the sermon in their media player in the car/home/phone/etc. The intro kicks in and they adjust their volume control to something comfortable for them. All of a sudden after the intro finishes the sermon is remarkably softer than the intro, so the listener would instinctively turn the volume up a bit (or quite a bit if its really soft). Their media/cd player is by default set to repeat (since its one sermon per cd). When the intro loops back again, because the intro is originally quite loud, guess who's in for a shock. Visa versa if the intro was soft and the sermon was loud.
- Taken an extreme example of not mixing the volume properly, the listener takes the sermon home, and maxes his/her media player's volume control, but it's still very, very soft.
Notice that both scenarios will upset the listener when they can't hear the message properly or gets a shock from the sudden change in volume, not to mention make it sound unpolished and unprofessional. To make sure we don't fall into this trap, there are a few things to do.
Find a reasonable level to work with
Start with the Intro mp3. Because this mp3 is pre-mastered, it has a set volume already, and don't require any additional compression or eq etc. Playback the intro and watch the meter on the output channel to see where it's jumping up to. You may need to reduce the volume of the intro slightly (about 1-3dB) by lowering the fader on the intro track. Lets aim for an average of just above the maximum fader position of the output channel strip (see red arrow on following picture).
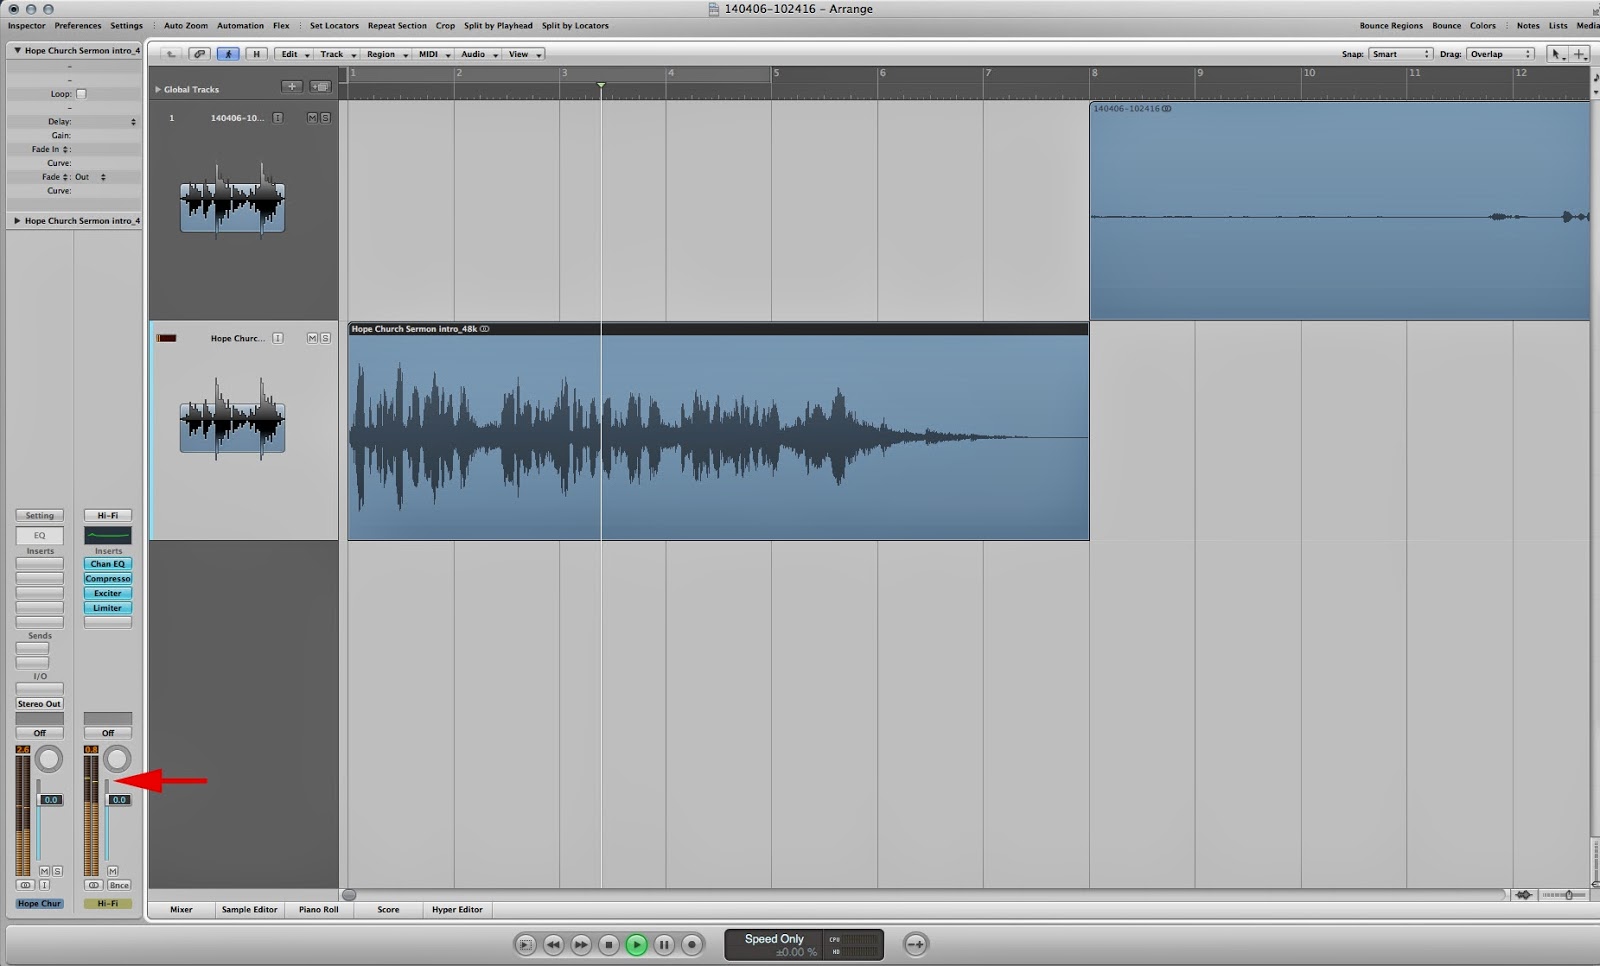 |
| Play the intro track and watch the output meter. |
Reason why I've chosen this point is that it roughly gives us a decent volume, with a bit of headroom incase it goes a bit loud. Taking the measurement from the output channel also allows us to have something to compare to when we are mixing down the speech track. Notice that the intro track meter and the output track level don't match. That is because there is an active compressor and other plugins on the output track that is boosting the levels a bit (remember when we enabled the "Hi-Fi" preset?).
EQ and Compression
Main article: EQ PLACEHOLDERLINK
Main article: Compression PLACEHOLDERLINK
Once we have a decent base line for the volume, we can start setting the level of the speech track. Notice if you just play the track at the moment the volume is softer or significantly softer (if no plugins are activated) compared to the intro just a bit before. That is because we need to normalize the track and bring it up to the right volume.
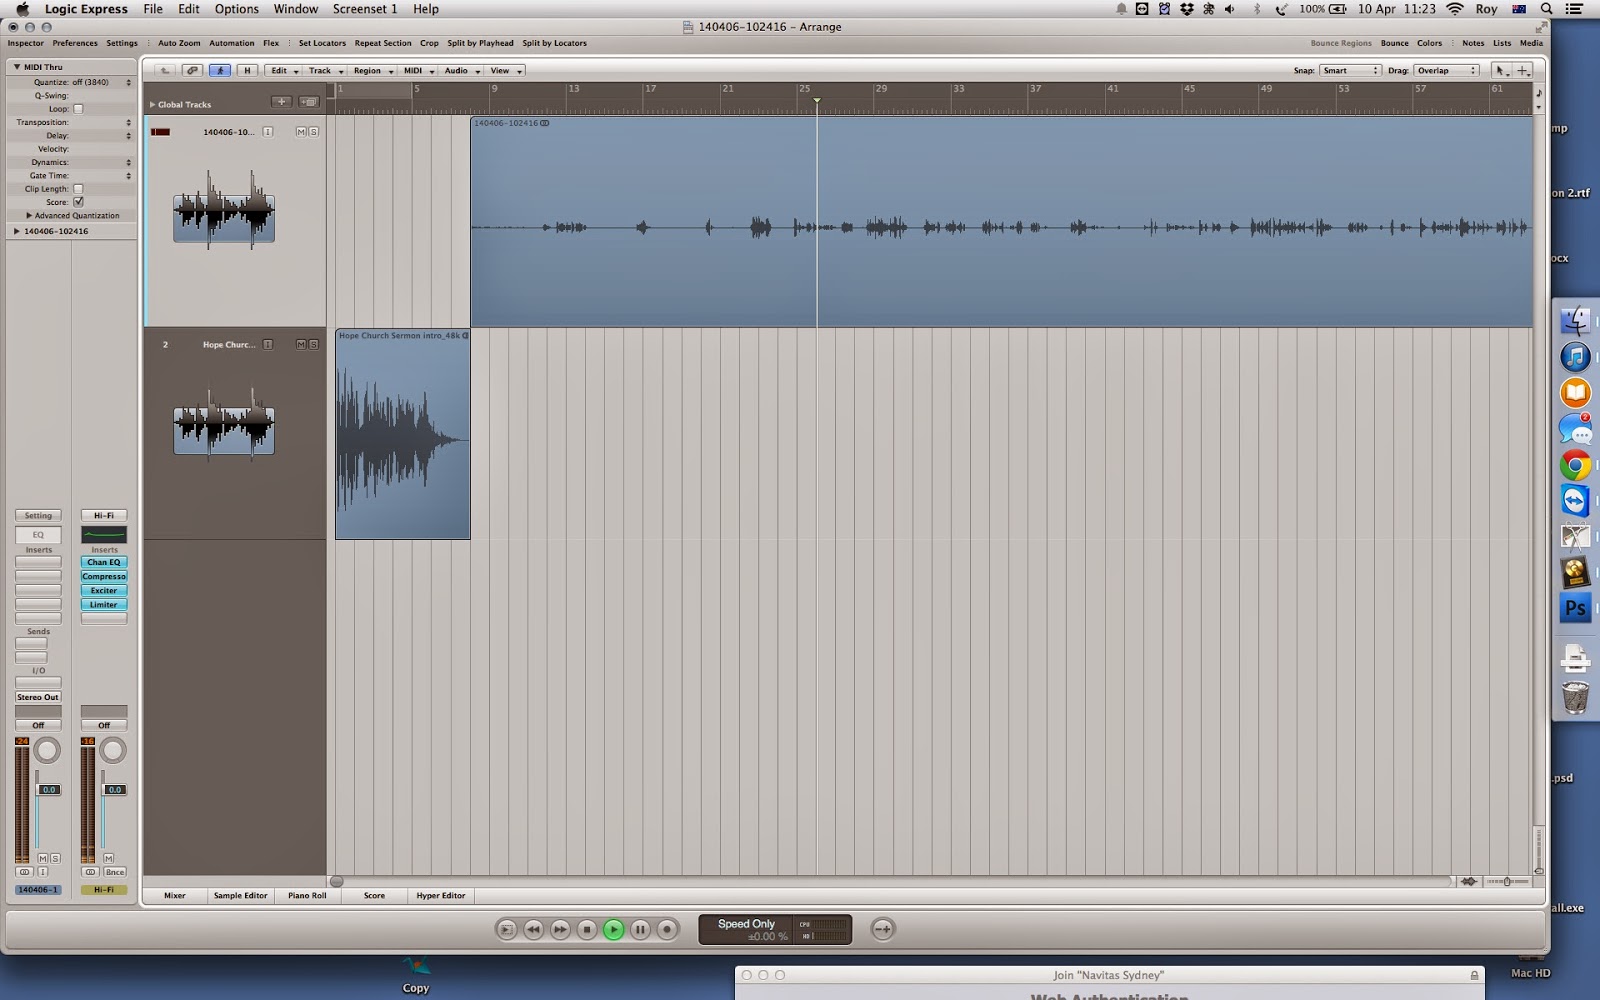 |
| Logic 9 Arrange window |
Start with properly configuring the compressor. Simply double click on the compressor's plugin button to open up the compressor's parameters page. You may need to bring down the threshold a bit so it kicks in, and change the attack/release/ratio a bit. When you pull down the threshold you will notice the levels getting louder. This is due to the compressor's make-up gain, which you can also adjust if you want that little extra boost or cut for extra few dB. For vocal compression you want to aim for an average of -3 to -6dB gain reduction (the blue meter at the top of the compressor plugin) and make the voice sound as natural as possible. When the speaker becomes "excited" and/or start becoming louder, then the compressor should automatically kick in and squish their voice down in relation to how loud they go. This is more for controlling or taming their voices so there's no major surprises. You can still go ahead and draw in fader commands through Logic. <>
 |
| Logic Compressor plugin window |
After you have gotten the compressor sounding nicely, we will start working on the EQ’s. The preset’s EQ settings are quite OK to start off with, but we still need to adjust it a little for the different speaker/preacher and microphone’s style. What you are aiming for is vocal clarity. Use the low cut filter (around about 80-100Hz) to filter out all the rumbling and reduce the lows to reduce the sounds of the plosives (“p”’s “t”’s “b”’s etc) - generally the boomyness of the voice, where there is a lot of energy. Too much reduction in the lows will make the voice sound thin and not have enough presence especially with male voices. The mids through to the highs will bring up the clarity of the voice. Be careful too much will make it sound very harsh and sharp. The highs will also bring out more of the sibilance, and add a bit of “sparkle” to the voice. More information about EQ’s check the link below.
 |
| Logic 9 Channel EQ plugin |
Cutting and Editing
Main article: cutting and splicing: PLACEHOLDERLINK
The main article above goes into detail how to cut and splice audio, but to keep things simple, here’s a quick recap.
To make life easier, switch the "Drag" function to "Shuffle L", where it will automatically snap (shuffle) the audio file to the left to the nearest region.
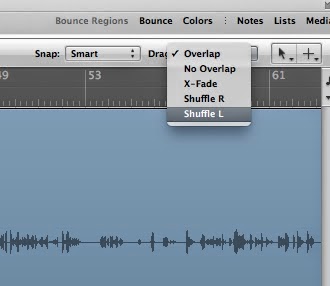 |
| Drag mode |
Occasionally there might not be a chance to get a clean cut, or if you are trying to shorten something (e.g. background/audience noise) you can use the cross fade or “X-Fade” function on the drag tool, which will automatically fade out the ending of one part, and fade in the new part.
To cut an audio track there are two ways. The first method is to simply select the track(s) you want cut, move your playhead in place, and click on “Split by Playhead”.
 |
| Splitting the audio track by playhead position |
The second method is to hold command (⌘) and your cursor will turn to a “+”. By default, holding the command (⌘) key will bring up your Marquee tool, if not you can hit “esc” or go to the top corner of your arrange window, and select it. Just like in Photoshop, the Marquee tool selects a region you drag the tool over, but in Logic there is two functions. Just selecting it will highlight the part selected on the track, and if you press play it will play just that section and keep looping until you stop. The second function is that if you click on it again, Logic will spit that region off the audio track and then you can shorten it or delete it altogether.
There are times where you will need to cut, splice and join the audio recordings together. What we are cutting and fixing is just to make the speaker sound a bit better, and clean up silent bits and unrelated bits. Cut where it is possible to cut and still sound natural, but if it’s not possible to get a clean cut, but the track still sound ok then let it be.
These are the things to look for to cut out:
- Umm’s, ahh’s, err's (those “lemme think what to say next..” sounds), *cough*s, clearing throat sounds etc
- Unnecessary repeating
- not to be confused with repeating to emphasise a point, but repeating for the sake of correcting themselves, or stalling for time.
- Think about the speaker referencing a bible verse, in the service, they need to stall time for the audience to be able to flip to the verses in time before continuing. The listener at home doesn’t need that time to flip to their bibles since it is read shortly after it’s mentioned, and if they missed the verse reference, they can simply just rewind the sermon those few seconds and listen again themselves.
- Silent bits longer than 2 seconds or so
- back to the example of the speaker pausing for a bible verse (for people to turn to). Without context of the person attending the service, for them it sounds like the speaker had stopped speaking and would wonder if the speaker had finished the sermon, or wonder if the audio had suddenly dropped in volume and attempt to turn it up (guess what happens next).
- unrelated jokes and references
- occasionally the speaker might speak or joke on a tangent that doesn’t relate to the overall message, but to engage the audience.
- Listen carefully to the parts before and after this section, and judge if it fits the message or not.
- games and audience interaction that doesn’t fit the sermon.
- In the perspective of the listener, if they were listening to that section of the sermon where the audience is playing a game would it make sense to them?
- If you need the game mentioned as it’s part of the sermon, then you can shorten and cross-fade the audience to give a bit of perspective to the listener so they know “Hey, they were playing something here” and move on.
- Video clips or media clips etc.
- Same as above, but if you need the video referenced you can cut it after the speaker had said “and here is a video…”
If you pay attention and make notes during the service, then it makes it easier to spot these things AND you can note down the time when it happened so you know when to look out for in the recording. You will have to use your own judgement on these things, and some of it is simple enough to know when to get rid of (ummms, ahhs, coughs etc) but context based ones are a bit harder. You can use the colours or markers in Logic to note different parts of the sermon where you need to revise if you are unsure etc.
A warning that must be given, is that however you edit can affect or change the message given, so be aware of what you are removing. If unsure, just grab an audio bite (small excerpt) of the part of the sermon and send it to the Pastor for advise.
You might have to trim the start of the speaker track since the opening sometimes have unneded content (greetings, jokes about clapping etc), and once you have done so, you can drag the start of the track a bit to the left over the end of the intro track. The idea is that as the intro automatically fades out, the speaker would nicely fade into the sermon. You can also use the Fade tool if you want the speaker track to fade in nicer.
PLACEHOLDER IMAGE CROSSFADE TRACKS
Finishing off the mp3
Main article: Bouncing to an Mp3 PLACEHOLDERLINK
Once you complete your editing, you will need to save it as an Mp3. See the email for the current list of names and titles for the speaker, or alternatively just copy and paste from the Sermon Titles database. General rule of thumb is usually the full name (first + last name) of the speaker, prefixed with their title (Pastor, Dr, Reverend etc)
The main article goes into depth on how to save to mp3 or “bouncing” a track down. But here is a recap.
Using the timeline drag-select the region you want to bounce. If you don’t select it, Logic will assume that you want the whole project bounced (however long it is)
 |
| Selecting the region on the timeline |
Go to File > Bounce or Command + B (⌘B) to open the Bounce screen
 |
| Logic 9 Bounce output screen |
Rename “Output 1-2” to the sermon title, click on “Mp3” and the Mp3 options will pop up. Check the “Write ID3 tags” then click on the [ID3 Settings] button to open up the window below.
 |
| Logic 9 ID3 Settings window |
Fill in the blanks as required.
- Song title = Sermon title
- Artist = Speaker
- Album name = name of the service (Hope Mission Centre Sermons, Youthopea, Sunday Nights) or series (HMC Sermon Series…. etc.). See email on conventions.
- Comments = date/marker of the recording (date reversed, just to make it easier archiving)
- Genre = Sermon
- Publisher/Label = HMC
- Copyright = current year (2014)
Once done, click [OK] to return to the Bounce screen. You can select the “Save to iTunes” checkbox if you want to save a copy to your iTunes library. If you are using my mac, this is a requirement (saves having to copy it over twice).
Under “Mode” select “realtime” if you want to listen to the sermon again in its entirety while it is bouncing down, or “Offline” if you want the computer to just bounce it without playing back the sermon. Offline might be handy if you are limited in time.
And that’s it. Some of the links I’m still writing up, so I will update them when they are up. Any questions write it in the comments and I’ll get back to you when I can.
God bless
Roy.
Extra notes
- set up a dedicated folder on your mac or external HDD for all our audio work. This keeps everything neat, tidy and easy to find later on if you need to find it again.
- More info about sample rates PLACEHOLDERLINK
- Features of Logic 9's Arrangement window and customising it to suit your workflow PLACEHOLDERLINK
- Speed up your workflow by setting up templates PLACEHOLDERLINK