Hi Visitors!

Parts of this blog has references to internal procedures that we do at our church, but you can adapt or use the ideas for your own if you need to.

Have fun mixing and God bless!
Roy.

Tuesday, January 21, 2014

Cleaning and Maintenance Process

We will start a cleanup/maintenance roster. This should only take about 15 minutes a week and to make it easier we will do it during the lunch break between church and Sunday night. I don't mind when you do it, as long as it gets done so don't forget! Think about Church as our other "house" and the stage and desk is our studio, likewise we like to keep our stuff at home nice, tidy and working.

Note if anything sounds bad or humming/crackling etc. (It may also be a wrong setting on the desk) or needs replacing/fixing. You may need to note if the gain or other settings need to be adjusted etc. General rule of thumb - if it looks/sounds wrong then check it out

=============================

Task: Clean and wash microphones 

Time: 5 minutes
Repeats: Weekly after Sunday Nights (we should already be doing this), after every service at the end of the day during flu season.
Process:

  1. Collect microphones from stage at the end of the session of the day
  2. Remove the grill with foam inside (microphone head) from main microphone body by screwing it off
  3. Rinse under hot water until foam is fully soaked and water can pass through the foam grill. Use antibacterial soap every month on the grill and wash thoroughly
  4. Dry off as much excess water by flicking it off outside or in the basin
  5. Place on the chux wipes or tissue paper on the audio desk to dry overnight
  6. Replace grills for next service after it has dried completely

Task: Check and maintain microphones + leads

Time: 15-20 minutes
Repeats: monthly
Process: 

  1. Inspect each microphone for physical or electrical damage
  2. Inspect each microphone cable for physical or electrical damage (eg cable tester, connection test)
  3. Replace coloured tape every three months or if it is damaged
  4. Soundcheck microphones, look for any hum or crackling when you move the mic around with the cable securely placed
  5. Wipe down leads

Task: Check and maintain drum equipments, microphones + leads

Time: 15-20 minutes
Repeats: Every month
Process:

  1. Wipe down/dust drum kit
  2. Inspect for rust on metal parts, damaged/worn skin on drum surface etc
  3. Inspect microphone and leads on the drum kit (see "check and maintain mics")
  4. Soundcheck drums starting from kick drum, then snare etc one by one with headphones/second person to listen to the sound quality. 

Task: Check and maintain Keyboards, guitar and FX pedals, cables and leads (and any other instruments)

Time: 15-20 minutes
Repeats: Every month
Process:

  1. Wipe down/dust instruments and equipment
  2. Inspect for damage on keys, buttons, knobs, screen, cable jack etc
  3. Inspect microphones, DI units and leads where applicable and test (see "check and maintain mics"
  4. Soundcheck the instruments one by one and listen for the sound quality.

Task: Check and maintain Speakers, personal monitors, headphones/headsets and any other outputs

Time: 15-20 minutes
Repeats: Every month
Process:

  1. Wipe down/dust equipment
  2. Inspect for damage on keys, buttons, knobs, screen, cable jack etc
  3. Inspect leads where applicable and test (see "check and maintain mics")
  4. Soundcheck the equipment one by one and listen for the sound quality.

Task: Check curtains clipped together properly and not showing any metal clips

Time: 5-10 minutes
Repeats: Monthly
Process:

  1. Inspect each curtain split for breaks, openings or metal clips showing
  2. Re-apply clips to seal the gaps in the curtain and check it alignes properly
  3. Make sure there is enough separated parts for backstage access (power switches, instrument storage etc)

Resources #1: The Basics

Basics courses
Intermediate Courses


  • Cordless mics/systems
  • Microphone techniques part 2
  • Drums setup
  • Guitar setup
  • Mixing techniques part 2
  • Gates/Expanders
  • Advanced compressor techniques
  • Sunday, January 19, 2014

    Recording on the X32 (Direct USB)

    USB Recording Quick Start Guide
    1. Insert USB, verify connected properly
    2. Press VIEW on TAPE section [X32] or Recorder [iPad]
    3. Check source of recording is correct
    4. Use rotary knobs or soft buttons to press record/stop/play etc.
    5. It will automatically save after stopping
    Note: don't unplug USB while Access Light is blinking. The default setup is recording a stereo track from FOH mix (post fader).

    Introduction and Setup

    Using the recording system built into the X32 is quite simple and also powerful. The only limitation is the amount of space on your USB drive, and that it can only record stereo or two tracks from the system. Test your USB drive does work with the X32 before you start your live session, as there is known compatibility problems with certain USB drives (mostly to do with insufficient read/write speeds).

    Once you have the configuration sorted out, the system is quite easy to operate. Having a mix from your FOH mix has its benefits, for example you can listen and review the mix later at home to see where you can improve on, quickly edit, master and bounce the wav file to MP3 for distribution or archival and so on.

    The Home Page

    This is the first screen you are greeted with when you hit the View button under the USB slot.

    X32 USB Recorder Home Tab (X32-Edit version)

    The look and feel of this page is homage to the oldschool tape recorders that were around back in the day. Your home tab contains a quick summary of whats happening and also your controls for recording/playback etc. 
    • On the left hand side, there is a recording input/playback meter and the source mentioned (default is taken from Front of House aka Main L/R). You can edit these settings in the config tab.
    • The centre has a graphic of a tape player recorder, with relevant buttons underneath for stop/play/pause/rewind/fast forward and record using the "push" function of the rotary encoders at the bottom of the screen. The label strip on the top of the "cassette" will show the current filename for the recording or playback.
    • The right hand side gives you a list of files and folders contained in the USB drive attached. With the sixth rotary knob you can select what file or folder you want to playback or record to.

    X32 Recording Status display (X32-Edit version)

    At the top centre of the X32's display screen, you can see the current status of the USB recorder, including the file name of the recording, a timer and the playback status (stopped/recording/playing etc).
    • The filename is in reverse date format, then time stamp in 24hr time. Eg R_YEARmonthDAY-HRminSEC
    • The timer is handy for editing at post production. You can note down exactly the time you need to fix and later on just jump to that time to cut/edit it out

    The Config Page


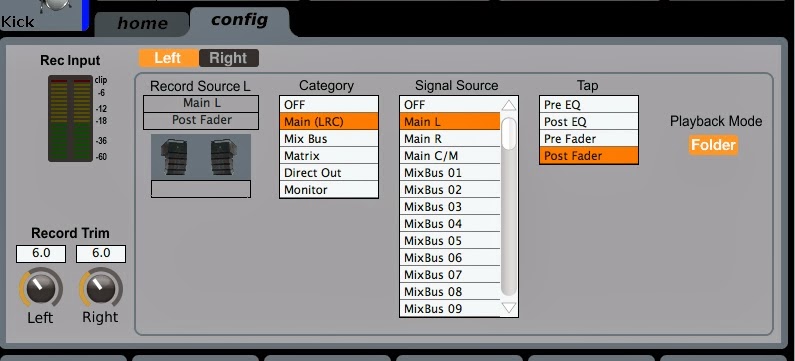
    X32 Recording Config tab (X32-Edit version)

    The config page is where you can change the source of your recording, as well as provide a boost where the audio coming in from the source is too soft or too loud, but you don't want to change the gain from the actual channel.
    • The left side shows you the input meter, and directly underneath it is the "Trim" or gain knobs. You can adjust this up or down to get a decent recording level from the source
    • The right hand side is your source selection and where the "Tap" is from.
      • The "Category" table lets you quickly jump through the available Main busses, mixbuses, Matrix, direct outs and monitors
      • Signal source is where you select the signal from. The default is normally from Main L/R and Post fader.
      • The "Tap" is from where the signal is recording from - 
        • "Pre EQ" will tap before the EQ and everything else. This will give you an almost "raw" signal
        • "Post EQ" will tap the signal from just after the EQ, before the dynamic effects and the faders. Use this if you want to have an EQ corrected signal
        • "Pre Fader" will tap the signal before the fader AND before the mute switch. It also takes it after the EQ and dynamic effects. Use this if you want your recording to have the EQ and compressor etc effects on it, but don't want to be affected from your live mix when you bring up or down the fader during the mix.
        • "Post Fader" is after all of the EQ, dynamic effects and the faders, so any changes you do while mixing for that channel will reflect on the final recording. Eg: Record Source Main L/R Post fader and you mute FOH is same as not recording any audio.
      • You will need to set both Left and Right channels, since you can assign different sources and input gain on the left and/or right channels of your recording. On the desk press the second rotary knob to switch between the two. The iPad remote you just need to tap the setting you want to change.

    Controlling the recording and playback

    Play/Record/Stop/Fast forward commands should be simple to figure out. The buttons are labeled under the main view page and simply just tap on it to activate what you want. You can map them to the assignable buttons on the X32 to make access easier (Link TBC)

    Playback will come back through the Aux In page on the desk, under USB L/R channels. Bring up the faders to desired levels to play it through the system. You can select the file that is on the USB with the far rotary knob.

    The files saved by the recorder will automatically have this file name on it e.g. “R_20140303_140342.wav”. The good thing about this is that the file name is unique, and it is also dated with a time to make sorting out or finding the file easier in the future. In other words the file name is based on this template: R_YYYYMMDD_HHMMSS
    • “R” = Recording
    • “YYYYMMDD” eg:  “20140303” is the date. 4 characters for the year (2014), followed by 2 characters for the month (03 aka march) then 2 characters for the day (03).
    • "HHMMSS" eg: “140342” is the time. 2 characters for the hours in 24 hours time (e.g.: 1400hrs aka 2pm), followed by 2 characters for the minutes (3 minutes past) then 2 characters for the seconds (42 seconds past)

    USB Drives

    The USB port on the top of the desk is convenient to plug in a flash drive to, but as Behringer officially states on the manual “Not all drives are compatible with the X32 recording system”. Therefore you should test your usb drive before you start your recording session so you don’t have any unpleasant surprises during the performance, especially if it’s a new drive you are using. From what I’ve tested with here are the requirements that are most likely to work:
    • Must have Fat32 formatting
    • Can be a flash drive/pen drive or external hdd (I’ve managed to get a 1.5tb pocket hdd)
    • USB 2 or USB 3 spec
    • Enough free space for recording (otherwise it will stop automatically and you might not know when it does during a show)

    Again, the disclaimer is that your milage will vary depending on what you might/might be able to use. If it’s an important show make sure you test it before the show! If it doesn’t work make sure you have plan B ready.

    Monday, January 13, 2014

    X32 Quick Start Guide for HMC

    Introduction

    Hi all,

    If you haven't already, check out the quick start guide or the manual for the X32, and download the iPad/iPhone apps and also available on the PC/Mac through Behringer website. You can also edit your shows or scenes beforehand at home and simply load them in when you come in to mix with the PC/Mac app.

    For those reading in not from our church, most of these are related to specific procedures for use within our church, but you can adapt the ideas/generic parts for yourself.

    Input list for the desk is here.


    This post will contain new procedures and tutorials, this post will be just updated to what settings have changed, new scene defaults, monitor assignments etc.

    Tutorials 

    Turn ON desk: 
    1. Switch on desk at the rear of the console
    2. Ensure any instruments/microphones/etc is turned on or plugged in already
    3. Switch on Stage power and S16, verify link is established
    4. Switch on FOH Amp

    Turn OFF desk
    1. Switch off FOH amp
    2. Switch off Stage power in reverse order (8 7 6...)
    3. On the X32 > Setup > Safe shutdown (5th knob)
    4. Switch off console at the rear after Safe message has come on screen


    Mute groups:
    1. All instruments
    2. All Wired Vocals
    3. All Monitor sends
    4. All Aux In (Mac in, Video in, Aux in)
    5. Room Mic
    6. Translator Mic


    ***The following assumes you have already turned on the system and plugged everything you need in****

    Quick start guide:
    1. Check all DCA faders all on Unity and unmuted (flip to top button on Output side)
    2. Bring up FOH fader slowly until Unity
    3. Unmute groups you need (eg Monitors)
    4. Unmute/bring up the inputs you need on main bank of faders
    5. Mix accordingly


    Setup and Change Aux Sends (Stage Foldback/Video):
    Option 1
    1. Press SENDS ON FADERS
    2. Select bus # [iPad] or bus channel [X32] you want to edit (eg: Mon A)
    3. Your INPUT faders now reflect what you are sending out to that channel.
    4. When finished turn off SENDS ON FADERS button

    Option 2
    1. Select Channel you want to edit
    2. Hit Sends on Fader [X32] or navigate to the Sends tab [X32/iPad] on the detailed screen
    3. Your output faders will reflect what that channel is feeding to
    4. Exit Sends on Faders when done


    Playback from Visuals Mac/Audio
    1. Play music/video from target source
    2. Bring up Media or Playback fader on the DCA's

    Connect Remote Apps to desk
    1. Open X32 Mix app on the iPad
    2. Press Connect button if not connected (looks like an empty wifi icon with an ‘i’ on the top left corner)
    Assign an input source to a channel

    Load a channel preset

    Change the scribble strip content of a channel