USB Recording Quick Start Guide
- Insert USB, verify connected properly
- Press VIEW on TAPE section [X32] or Recorder [iPad]
- Check source of recording is correct
- Use rotary knobs or soft buttons to press record/stop/play etc.
- It will automatically save after stopping
A short video on this: http://www.youtube.com/watch?v=6OmlwKEUo-Y
Introduction and Setup
Using the recording system built into the X32 is quite simple and also powerful. The only limitation is the amount of space on your USB drive, and that it can only record stereo or two tracks from the system. Test your USB drive does work with the X32 before you start your live session, as there is known compatibility problems with certain USB drives (mostly to do with insufficient read/write speeds).
Once you have the configuration sorted out, the system is quite easy to operate. Having a mix from your FOH mix has its benefits, for example you can listen and review the mix later at home to see where you can improve on, quickly edit, master and bounce the wav file to MP3 for distribution or archival and so on.
Once you have the configuration sorted out, the system is quite easy to operate. Having a mix from your FOH mix has its benefits, for example you can listen and review the mix later at home to see where you can improve on, quickly edit, master and bounce the wav file to MP3 for distribution or archival and so on.
The Home Page
This is the first screen you are greeted with when you hit the View button under the USB slot.
 |
| X32 USB Recorder Home Tab (X32-Edit version) |
The look and feel of this page is homage to the oldschool tape recorders that were around back in the day. Your home tab contains a quick summary of whats happening and also your controls for recording/playback etc.
- On the left hand side, there is a recording input/playback meter and the source mentioned (default is taken from Front of House aka Main L/R). You can edit these settings in the config tab.
- The centre has a graphic of a tape player recorder, with relevant buttons underneath for stop/play/pause/rewind/fast forward and record using the "push" function of the rotary encoders at the bottom of the screen. The label strip on the top of the "cassette" will show the current filename for the recording or playback.
- The right hand side gives you a list of files and folders contained in the USB drive attached. With the sixth rotary knob you can select what file or folder you want to playback or record to.

X32 Recording Status display (X32-Edit version)
At the top centre of the X32's display screen, you can see the current status of the USB recorder, including the file name of the recording, a timer and the playback status (stopped/recording/playing etc).
- The filename is in reverse date format, then time stamp in 24hr time. Eg R_YEARmonthDAY-HRminSEC
- The timer is handy for editing at post production. You can note down exactly the time you need to fix and later on just jump to that time to cut/edit it out
The Config Page
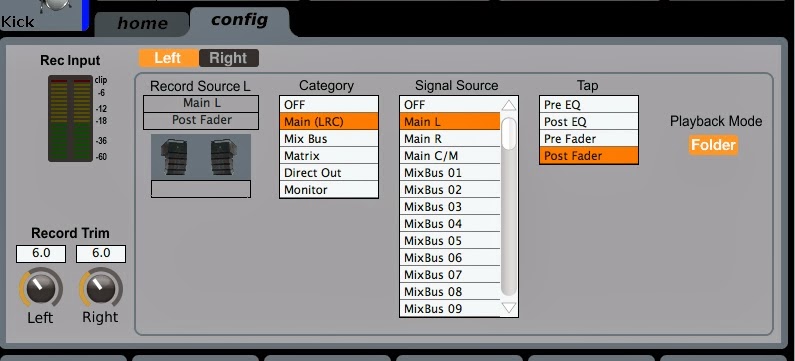
X32 Recording Config tab (X32-Edit version)
The config page is where you can change the source of your recording, as well as provide a boost where the audio coming in from the source is too soft or too loud, but you don't want to change the gain from the actual channel.
- The left side shows you the input meter, and directly underneath it is the "Trim" or gain knobs. You can adjust this up or down to get a decent recording level from the source
- The right hand side is your source selection and where the "Tap" is from.
- The "Category" table lets you quickly jump through the available Main busses, mixbuses, Matrix, direct outs and monitors
- Signal source is where you select the signal from. The default is normally from Main L/R and Post fader.
- The "Tap" is from where the signal is recording from -
- "Pre EQ" will tap before the EQ and everything else. This will give you an almost "raw" signal
- "Post EQ" will tap the signal from just after the EQ, before the dynamic effects and the faders. Use this if you want to have an EQ corrected signal
- "Pre Fader" will tap the signal before the fader AND before the mute switch. It also takes it after the EQ and dynamic effects. Use this if you want your recording to have the EQ and compressor etc effects on it, but don't want to be affected from your live mix when you bring up or down the fader during the mix.
- "Post Fader" is after all of the EQ, dynamic effects and the faders, so any changes you do while mixing for that channel will reflect on the final recording. Eg: Record Source Main L/R Post fader and you mute FOH is same as not recording any audio.
- You will need to set both Left and Right channels, since you can assign different sources and input gain on the left and/or right channels of your recording. On the desk press the second rotary knob to switch between the two. The iPad remote you just need to tap the setting you want to change.
Controlling the recording and playback
Play/Record/Stop/Fast forward commands should be simple to figure out. The buttons are labeled under the main view page and simply just tap on it to activate what you want. You can map them to the assignable buttons on the X32 to make access easier (Link TBC)
Playback will come back through the Aux In page on the desk, under USB L/R channels. Bring up the faders to desired levels to play it through the system. You can select the file that is on the USB with the far rotary knob.
The files saved by the recorder will automatically have this file name on it e.g. “R_20140303_140342.wav”. The good thing about this is that the file name is unique, and it is also dated with a time to make sorting out or finding the file easier in the future. In other words the file name is based on this template: R_YYYYMMDD_HHMMSS
- “R” = Recording
- “YYYYMMDD” eg: “20140303” is the date. 4 characters for the year (2014), followed by 2 characters for the month (03 aka march) then 2 characters for the day (03).
- "HHMMSS" eg: “140342” is the time. 2 characters for the hours in 24 hours time (e.g.: 1400hrs aka 2pm), followed by 2 characters for the minutes (3 minutes past) then 2 characters for the seconds (42 seconds past)
USB Drives
The USB port on the top of the desk is convenient to plug in a flash drive to, but as Behringer officially states on the manual “Not all drives are compatible with the X32 recording system”. Therefore you should test your usb drive before you start your recording session so you don’t have any unpleasant surprises during the performance, especially if it’s a new drive you are using. From what I’ve tested with here are the requirements that are most likely to work:- Must have Fat32 formatting
- Can be a flash drive/pen drive or external hdd (I’ve managed to get a 1.5tb pocket hdd)
- USB 2 or USB 3 spec
- Enough free space for recording (otherwise it will stop automatically and you might not know when it does during a show)
Again, the disclaimer is that your milage will vary depending on what you might/might be able to use. If it’s an important show make sure you test it before the show! If it doesn’t work make sure you have plan B ready.
